How to Configure the Leo Rover Network
In order to apply any of the below modifications, you will need to reboot the Raspberry Pi. To do so, use the power button or type:
reboot
Switching the access point interfaces and wired connection modes
We provide a script for the most common Wi-Fi access point changes. To use it, connect to your Leo Rover via SSH and run:
sudo leo-config
This will open an interactive menu. From there, you can configure the access point interfaces and wired connection mode or view the current settings.
Access point interface options:
wlan_int- use the internal Wi-Fi interface to host the access pointwlan_ext- use an external Wi-Fi interface (USB dongle) to host the access point (default)disabled- turn off the access point
Wired connection mode options:
bridge- bridge the wired interface with the wireless access point (default)dhcp_client- use the wired interface as a DHCP client on an upstream network
To see all available options, type:
sudo leo-config --help
Changing the access point settings
First you have to connect to your Leo Rover via SSH:
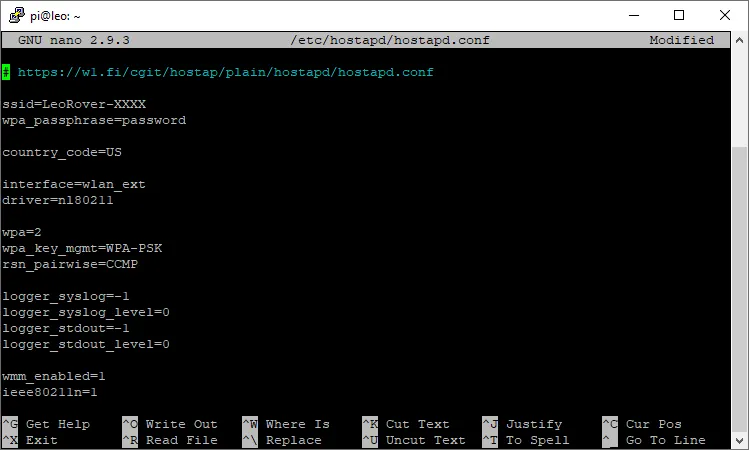
Modify the hostapd.conf configuration file by typing:
sudo nano /etc/hostapd/hostapd.conf
The editor interface should appear.
Change the SSID and password
Modify the ssid and wpa_passphrase fields.
ssid corresponds to the wireless network name (default: LeoRover-XXXX) and
wpa_passphrase is the network password (default: password).
Change the AP channel
This may be useful if you notice the network interference in crowded areas or you want to use multiple Leo Rovers at once.
Modify the channel field.
channel corresponds to Leo Rover 2.4 GHz Wifi access point broadcast channel.
You can choose from 1 to 11.
Set the country code
Modify the country_code field
Set to indicate country in which the device is operating (regulatory domain). The country codes follow the ISO 3166-1 standard.
This can limit the number of available channels to use.
Save the changes
Type Ctrl+O and Enter to save the modified configuration and Ctrl+X to exit the editor.