How to Control a Rover with Steam Deck
In this tutorial, we will show you how to use the Steam Deck with your Leo Rover.
If you want to use your Leo Rover in the field or somewhere outside the comfy lab environment, you may find operating from your host machine to be quite problematic. That's where a much smaller and handy device comes in - giving you full control over your rover at all times.
What to expect?
With Steam Deck's capabilities of a full-fledged computer, the range of its possibilities is virtually endless. So, we can't demonstrate every potential use, but we can give you a glimpse of its possibilities by showing you how we've applied it to our use case as an example.
Prerequisites
List of components
- Steam Deck,
- Keyboard and (eventually) mouse,
- USB C - USB adapter.
Software integration
In this part we are assuming you have your Steam Deck connected to the internet,
with all possible system updates installed (as for the time of writing this
tutorial the OS version is 3.7.13). You also have to operate in the desktop
mode (instructions on how to enter the desktop can be found
here).
As you will need to write some commands in the console on the Steam Deck, we recommend, for your comfort, to connect a keyboard and mouse to the device. You can also open this tutorial on the browser in the Steam Deck, to be able to copy paste the instructions.
To run ROS applications on the Steam Deck, we need to have some ROS installation on it. But as it's not so simple to install on the SteamOS itself, we will use distrobox to setup a container with ROS already installed.
As SteamOS 3.5 and later comes with distrobox and podman pre-installed, you
won't have to do much to make the ROS running.
Let's start with making possible to instal and update any package on SteamOS from the desktop mode. Run Konsole (Application Launcher -> System -> Konsole) and type those commands:
sudo steamos-readonly disable
sudo pacman-key --init
sudo pacman-key --populate holo
The commands above used sudo privilege - if you don't have sudo password on
your steam Steam Deck, you can easily set it up with
passwd
You will be asked to type in and repeat new password.
As we will use Docker Hub for installing the ROS container, first we will configure the default docker image source so we won't have to use fully qualified names of the images. First, open Podman configuration file for editing:
sudo nano /etc/containers/registries.conf
And add Docker Hub to the list of unqualified search registries (the
unqualified-search-registries option is already in the file, but commented -
find it, uncomment, and swtich the default value to "docker.io"):
unqualified-search-registries = ["docker.io"]
Once this is done you are ready to create the container. Simply type this in console on Steam Deck:
distrobox create -n ros-jazzy -i osrf/ros:jazzy-desktop
The -n option specifies the name of created container so you can change it to
your desired name for the container.
With this command we at once create a container named ros-jazzy and try to
pull a docker image for ROS jazzy with desktop software from OSRF (Open Source
Robotics Foundation). As the image is surely not installed, you will be asked if
you want to download it now. Just press enter to start the download and
container setup. When the process finishes you can enter the container with this
command:
distrobox enter ros-jazzy
If you chose different name for the container, you will have to switch the name used in the command above for your container name.
First time you enter the container, there will be automatic setup done (installing packages, setting up user account etc.) which will take some time - therefore don't worry if you have to wait a bit.
Inside the container you will have Ubuntu 24.04 with ROS jazzy installed, which you can use as normal system.
Having completed the installation, you are ready to try our examples!
Examples
The examples described in this section were done for a rover configuration which has integrated lidar and realsense camera. You can follow those guides to get the same rover setup (you can omit those steps, but some of the applications will not work propperly):
Also for the examples to work, you have to connect your SteamDeck to the rover's access point.
We have provided a GitHub repository with additional files and setup scripts needed to perform our use-cases of the Steam Deck with Leo Rover.
Clone this repository into your Steam Deck:
You don't have to do the cloning from the created container. If you clone the repository from the SteamOS, you will be able to access the files from distrobox container.
git clone https://github.com/LeoRover/leo_SteamDeck.git -b jazzy
Once you clone the repository, all you have to do is to enter the directory with
the files and run the setup.sh script:
cd leo_SteamDeck
./setup.sh
The script will automatically detect all the created distrobox containers and will ask you to choose the desired one to install required packages in and setup the applications.
When the script finishes the setup, you will see three new icons on the desktop:
-
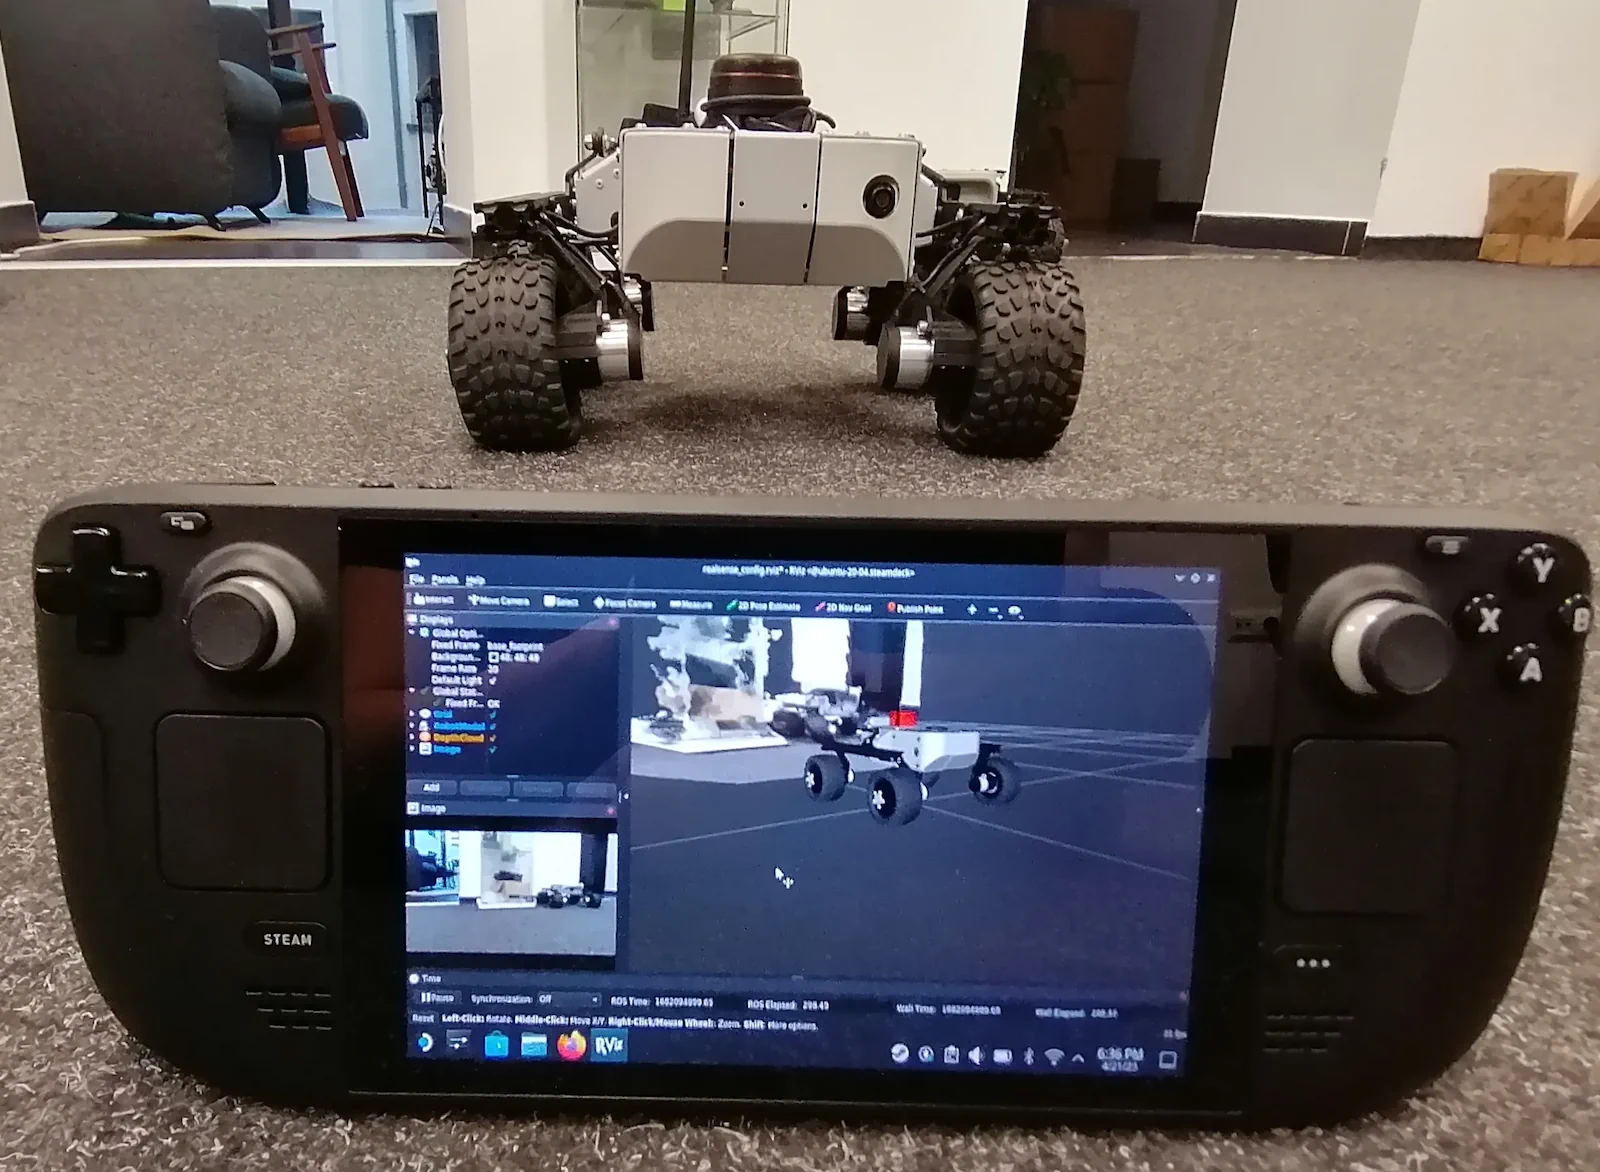
Leo Movement- example which allows you to operate the rover from your Steam Deck and display camera imageinfoThis is the simplest application and doesn't require any additional camera or LiDAR connected to the rover.
-
Leo Lidar- example which allows you to operate the rover from the Steam Deck and display LiDAR scan data in RViz -
Leo Depth Camera- example which allows you to operate the rover from the SteamDeck and display depth data in RViz
To move the rover while the chosen app is running, use the left joystick while
holding the L1 button. Moving the joystick forward/backwards controls the
rover's linear speed in x axis (forward / backward movement), and left/right
controls the linear speed in y axis (left / right strafe movement - available
only with mecanum wheels). To rotate the rover use right joystick (while still
holding the L1 button) moving it left or right.
Closing the opened window (wether it is RViz or rqt) will also stop the ROS nodes and the rover - you won't be able to operate the robot until running one of the apps again.
If your rover doesn't move with this setup, try unplugging all docking stations and external devices of your SteamDeck, and restart the device.
If this doesn't help, there is a file steam_deck_config.yaml inside the
leo_SteamDeck/configs directory. There are defined mappings for the axes and
enable button. You can change the predefined values of those parameters to
whatever axes and button id's you want. To find the id's of buttons and axes go
on your SteamDeck into System Settings -> Input Devices -> Game
Controller (remember that the id's you will put in the file are indexed from 0
not 1, so if you want e.g button nr 4 you need to put 3 in the file).
One last solution is to check the Controller Action. If it's set to Desktop then you won't get any readings from joysticks and buttons. You can switch the mode with the Start button (the one with three stripes next to A B X Y buttons) by holding it for some time. Current mode will be displayed in the bottom right corner of your screen (It needs to be in Gamepad mode for our applications to work).
Here you can see demonstration of usage of the described applications in our example: